![]()
MVRtoKuma - a tool to quickly create monitors in Uptime Kuma from fixtures defined in an MVR (My Virtual Rig) scene file or as discovered on the local network via ArtNet - ArtPoll.
- Uses pymvr to read/write fixtures from/to MVR files
- Uses Uptime Kuma (version 1 is supported) API for programmatic access
- Provides Graphical Terminal User Interface
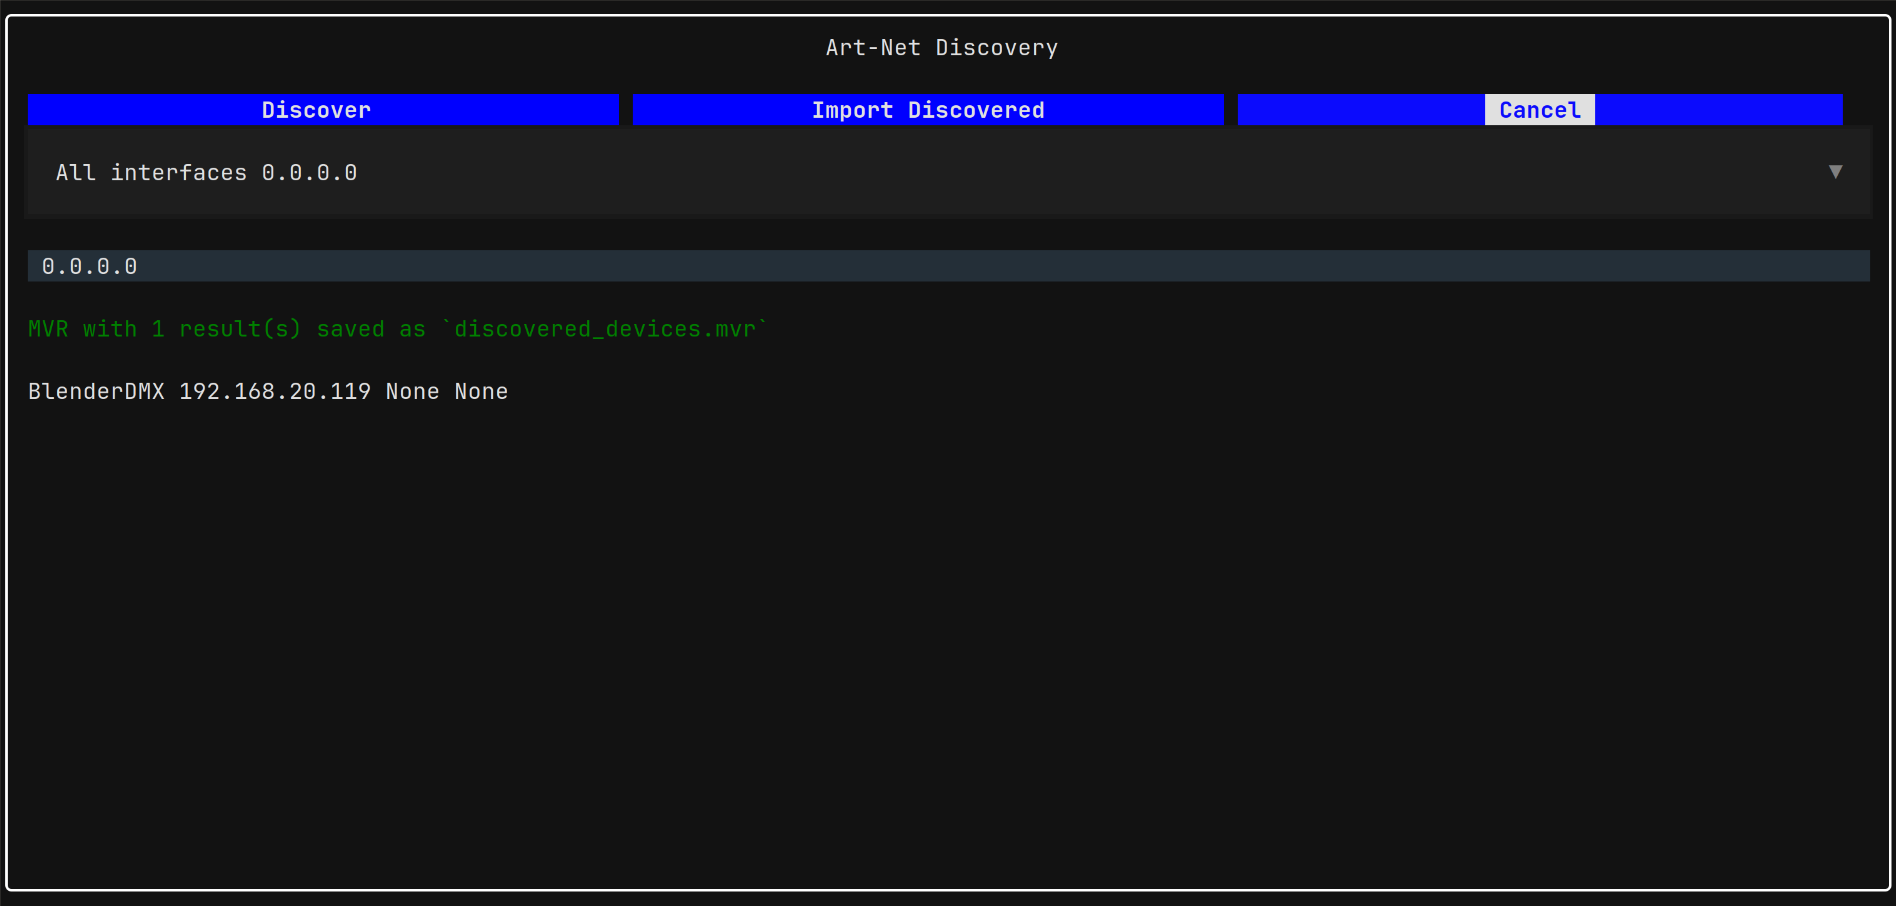
- Uses ArtPoll based device network discovery to create and/or auto-import an MVR file with list of devices discovered on the network
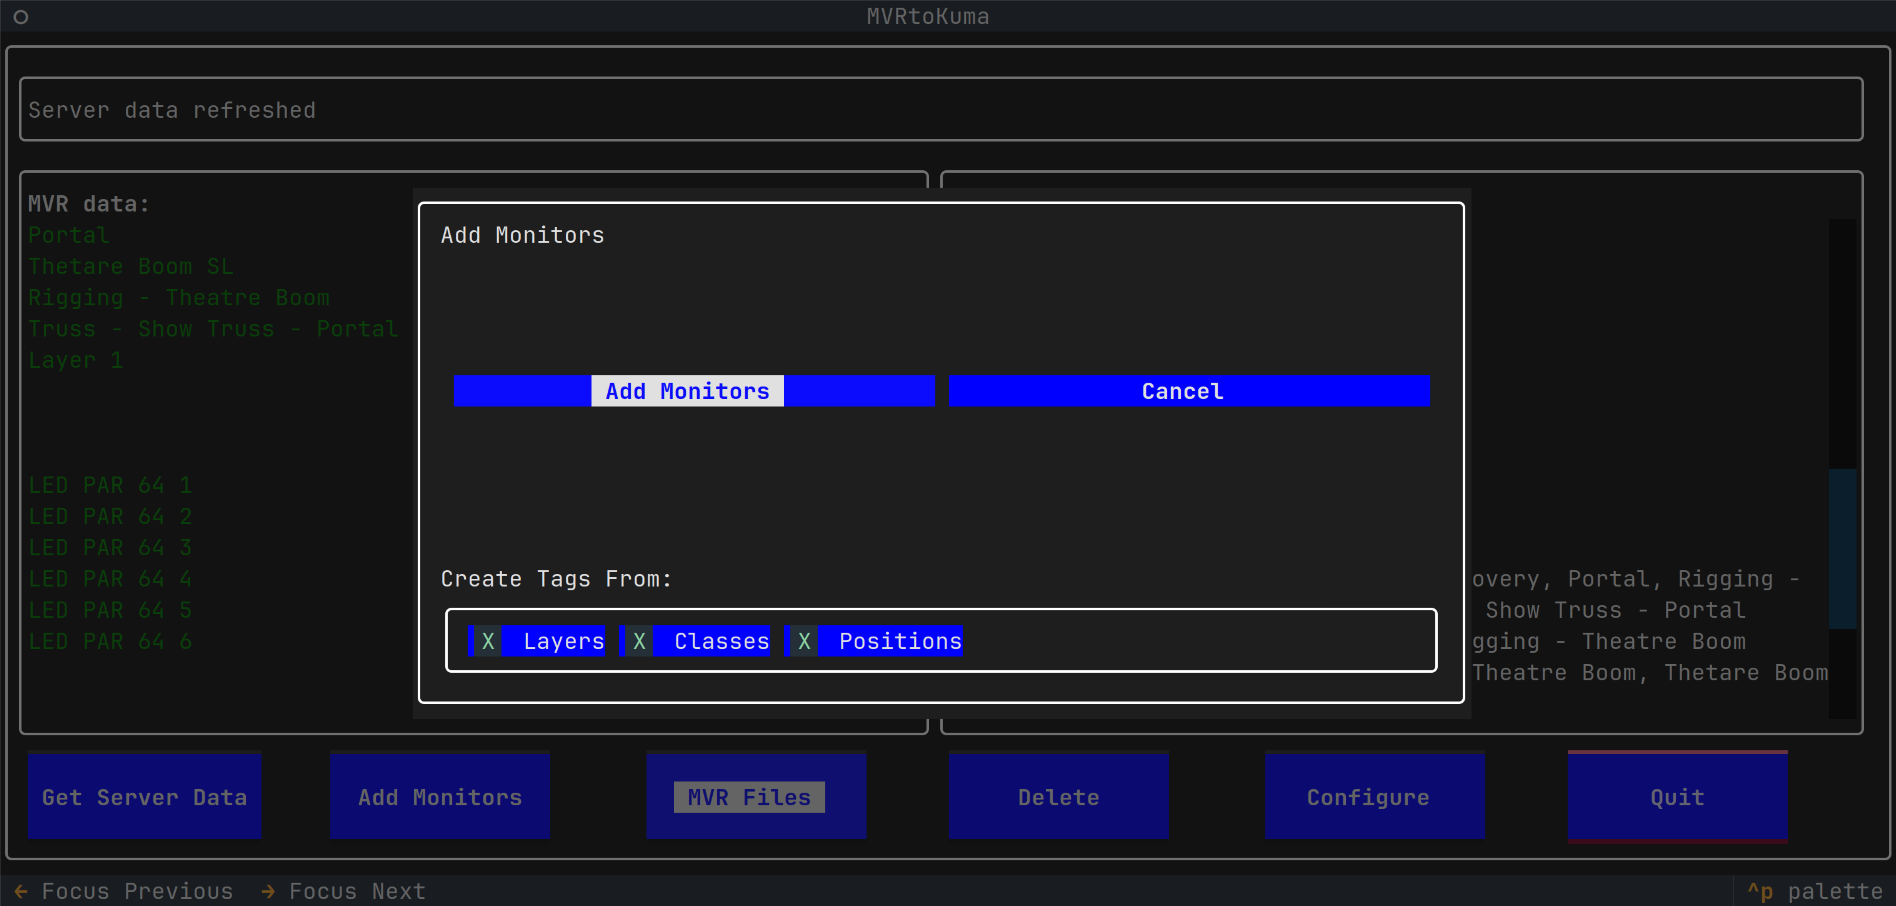
- Creates Kuma tags from scene Layers and from fixture Classes and Positions
- Creates Kuma monitors, marked with the above mentioned tags, allowing grouping in Uptime Kuma
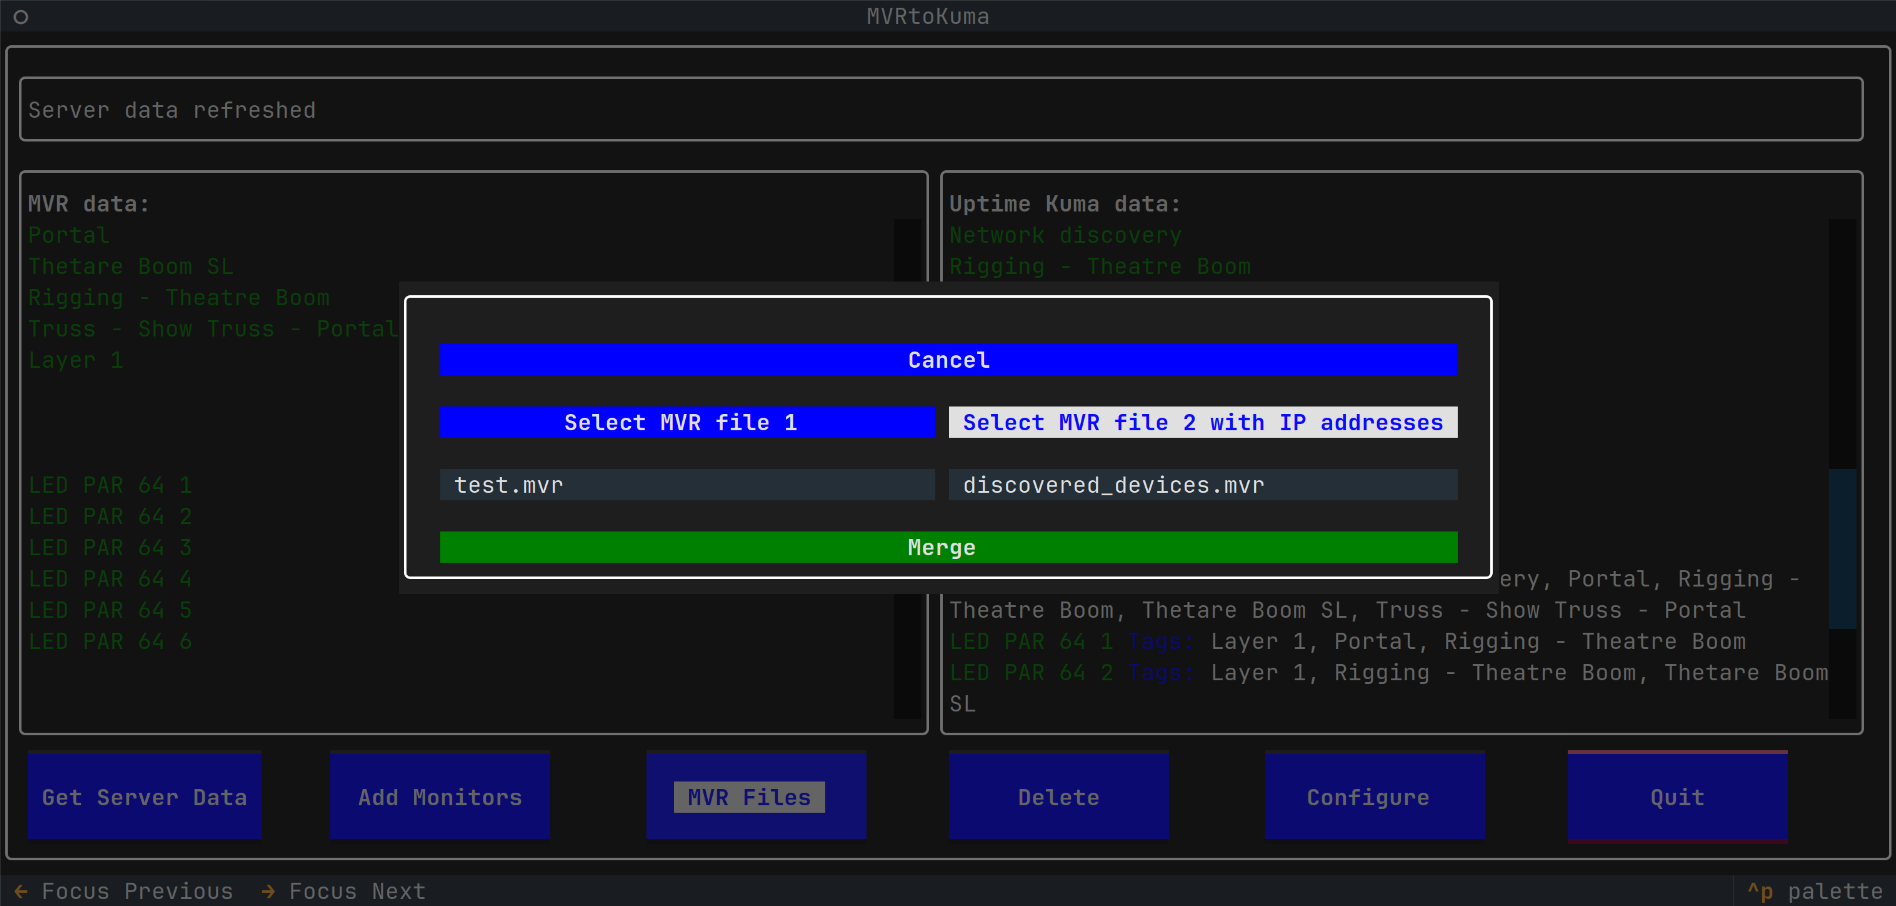
- Provides an MVR Merging tool, allowing to merge IP addresses from one MVR file (for example created by the Network Discovery) with another scene file - typically the main planning file. The fixture matching is based on fixture UUIDs or on DMX Universe + Address
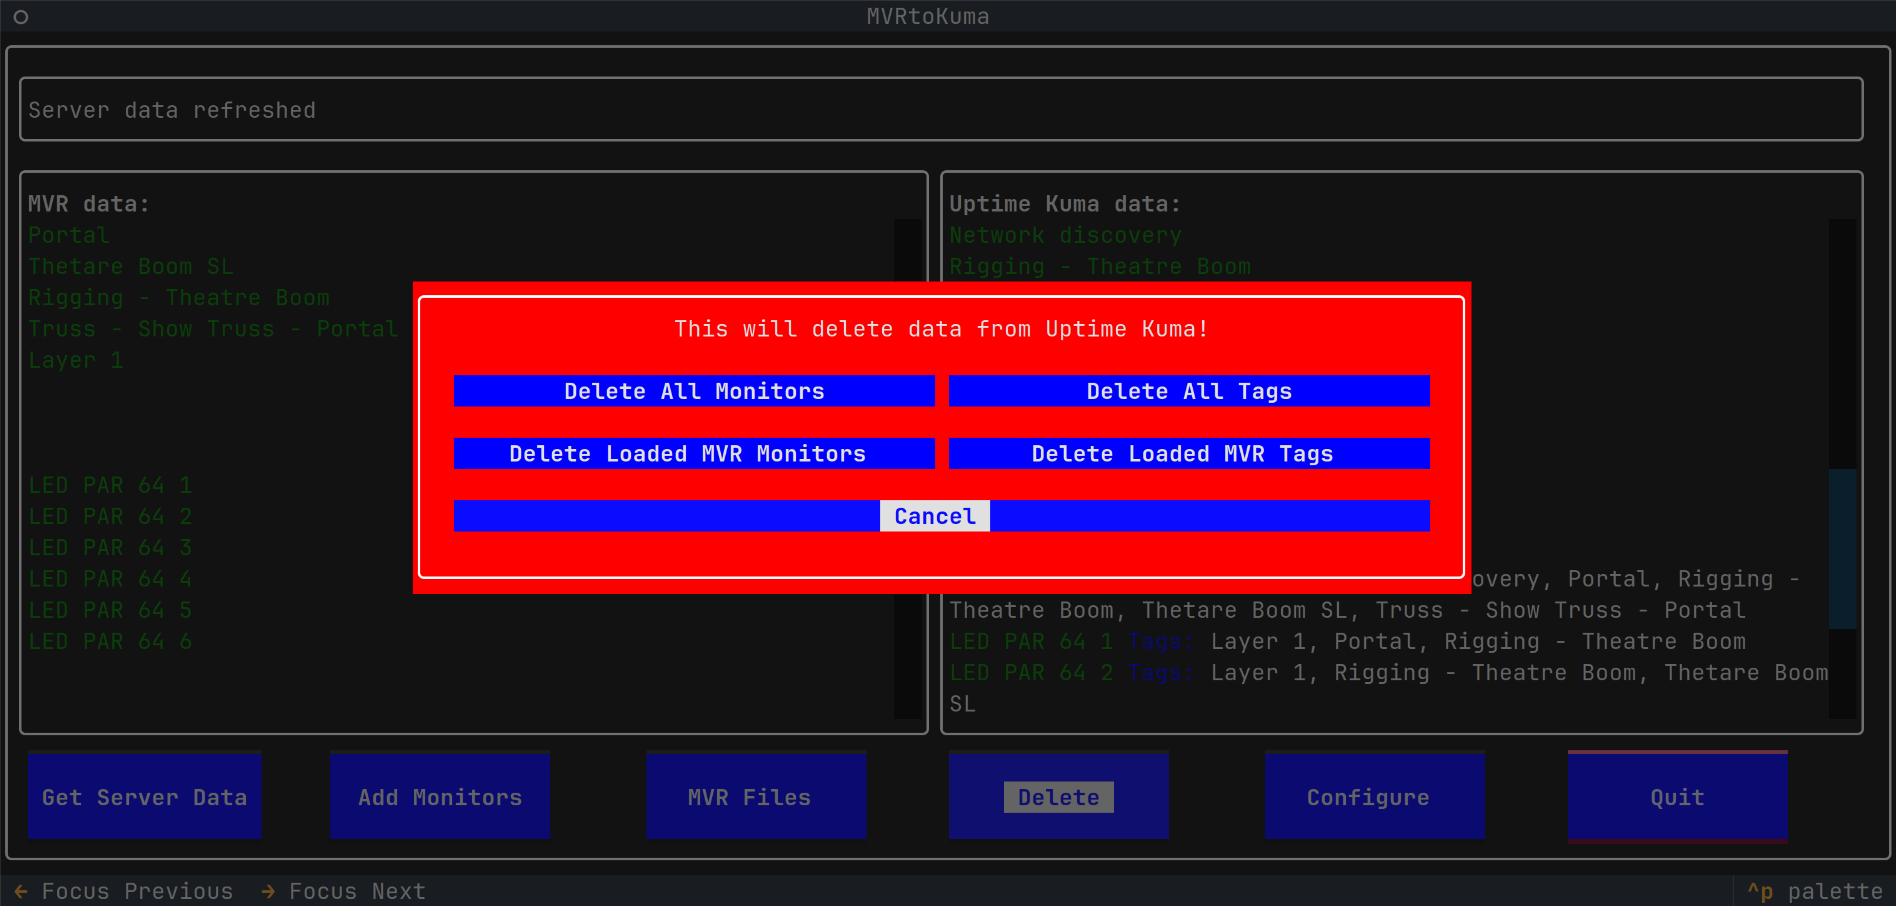
- Bulk delete of Uptime Kuma, monitors and tags - all, or only those matching from an MVR import
A tool to quickly create monitors in Uptime Kuma, based on fixtures defined in MVR scene file or based on network scan.
This is not a general tool to create MVR files. It also is not a general MVR file merger.
Read the Quick Start, see Screenshots and Recording, for further documentation, check out Features.
Binary releases for Linux, macOS and Windows are available from the releases. For other operating systems and for development, use the instructions below.
The My Virtual Rig file format is an open standard which allows programs to share data and geometry of a scene for the entertainment industry. A scene is a set of parametric objects such as fixtures, trusses, video screens, and other objects that are used in the entertainment industry. See documentation and further details on GDTF Hub.
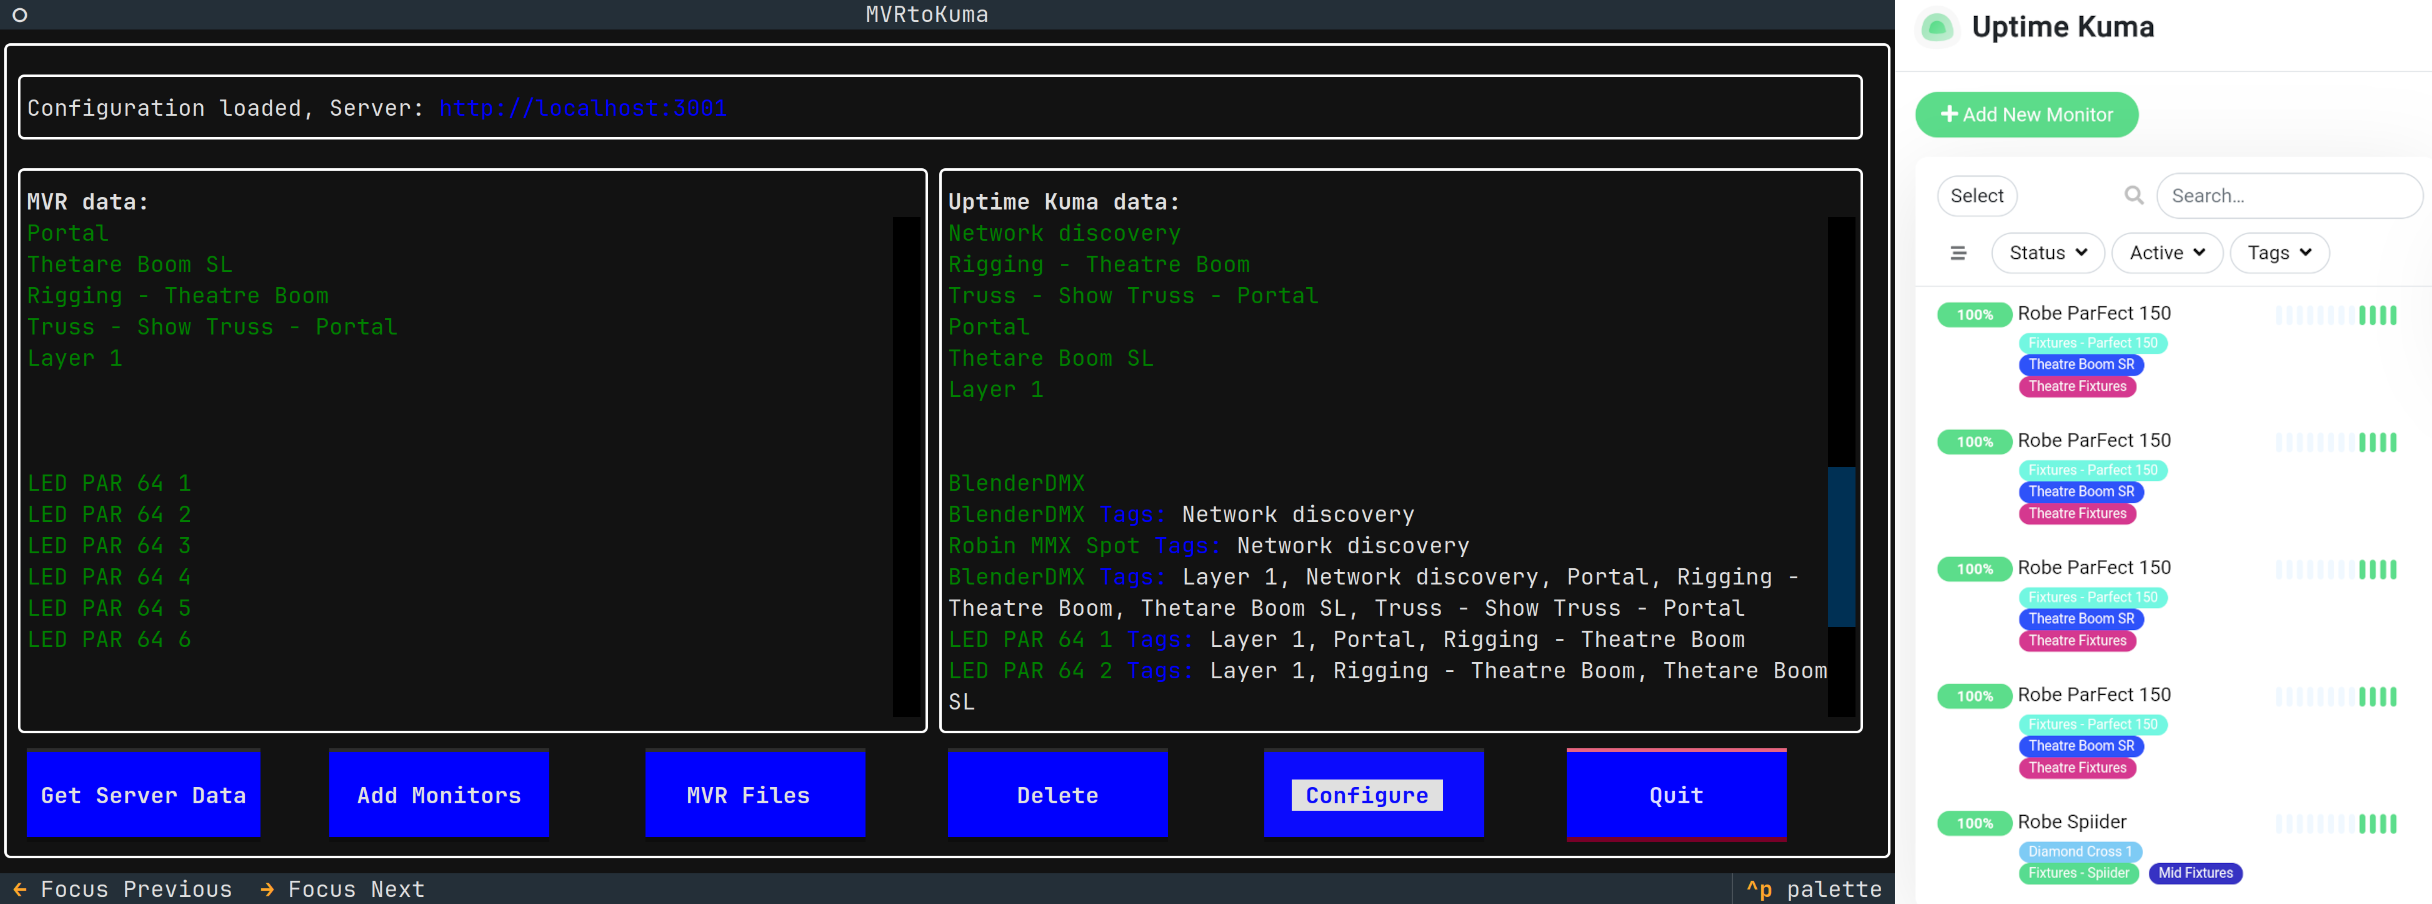
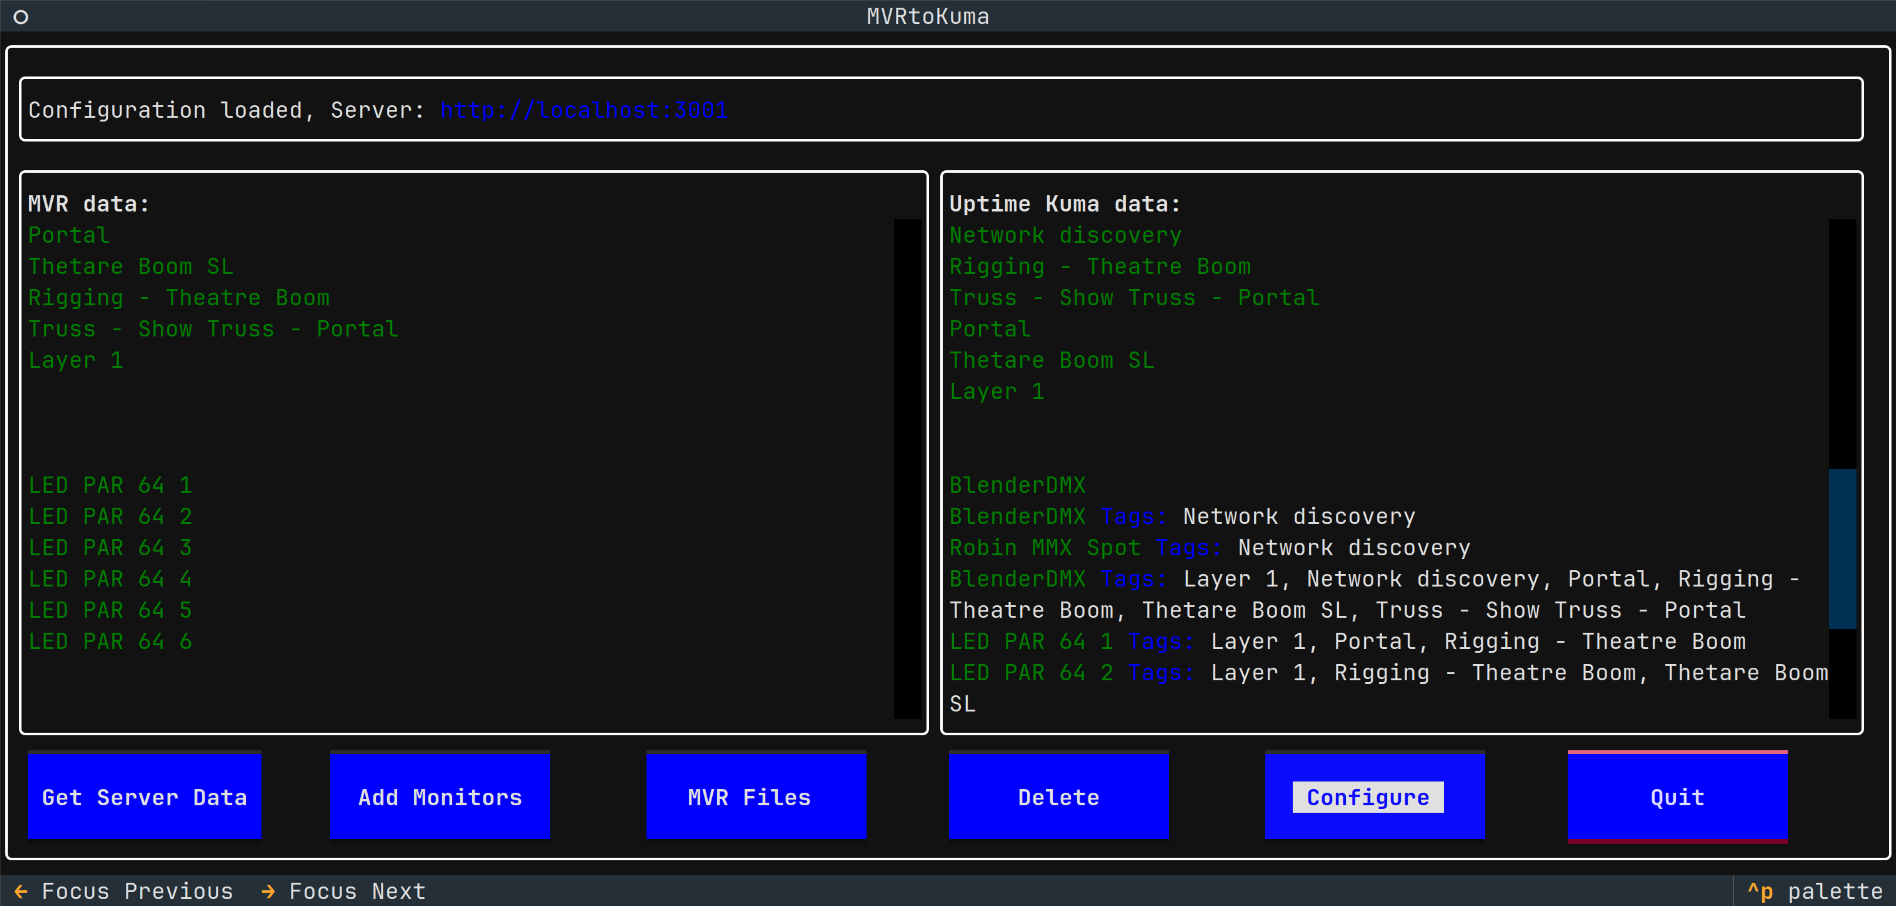
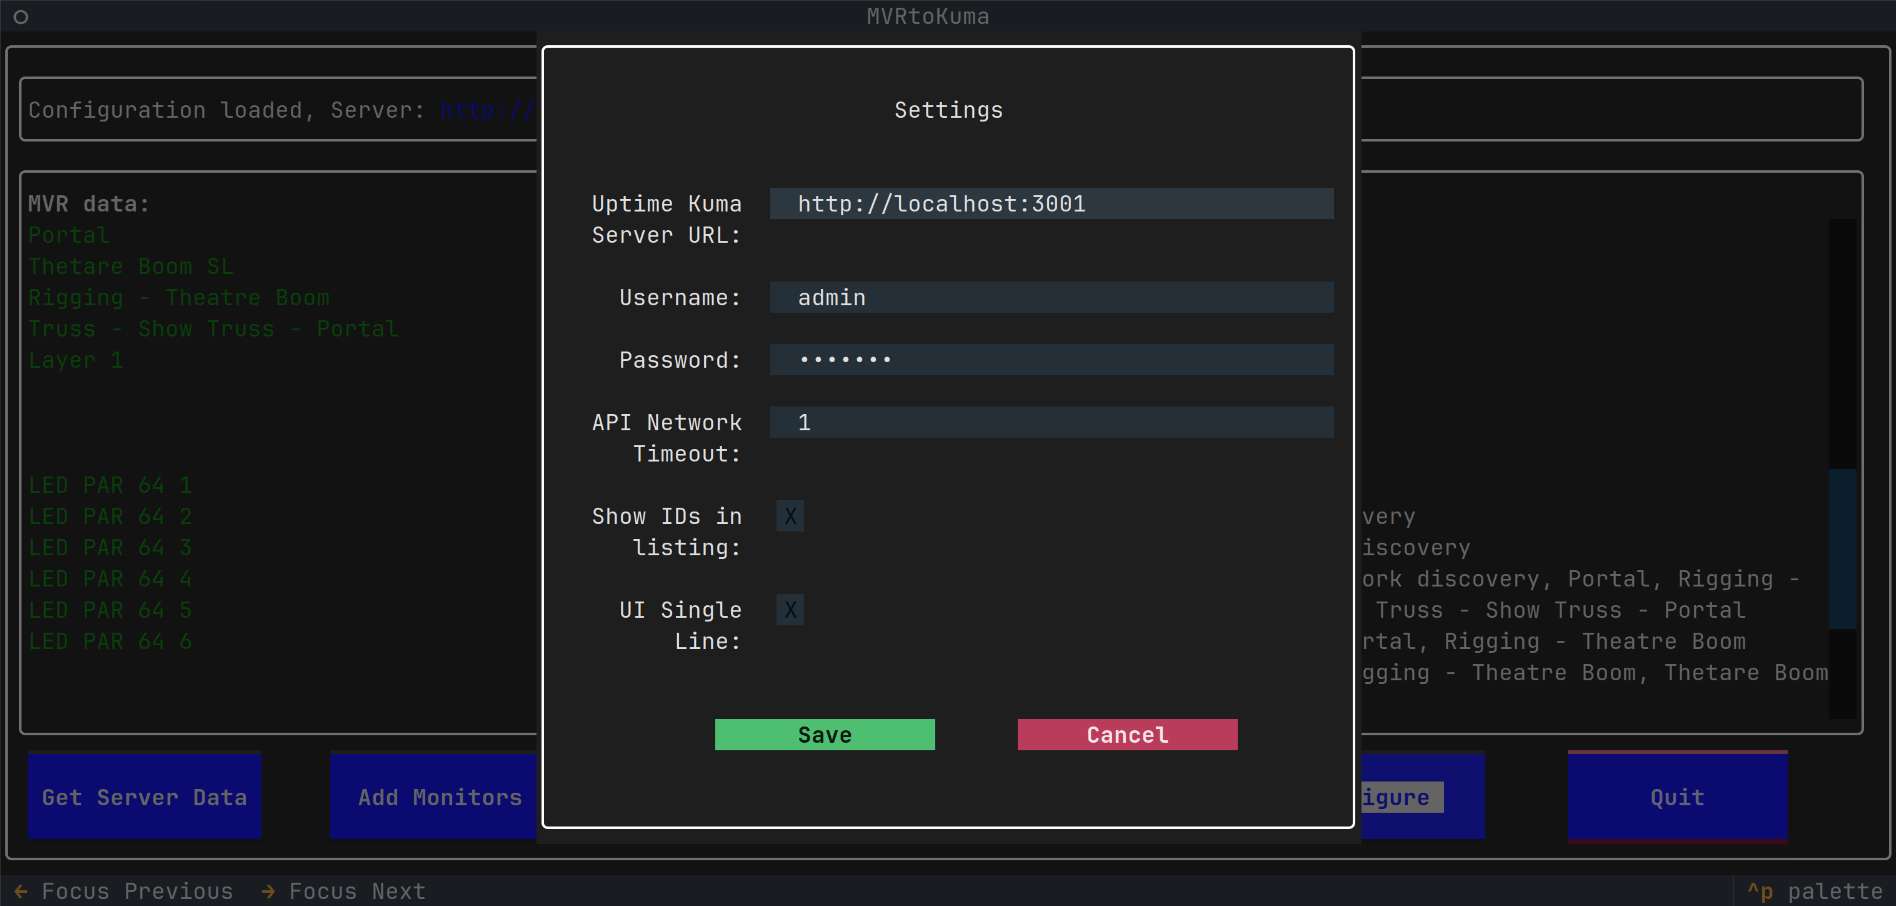
- Start the MVRtoKuma, configure settings for your Uptime Kuma server
- Use the
Get Server Datato get data from Uptime Kuma - Use
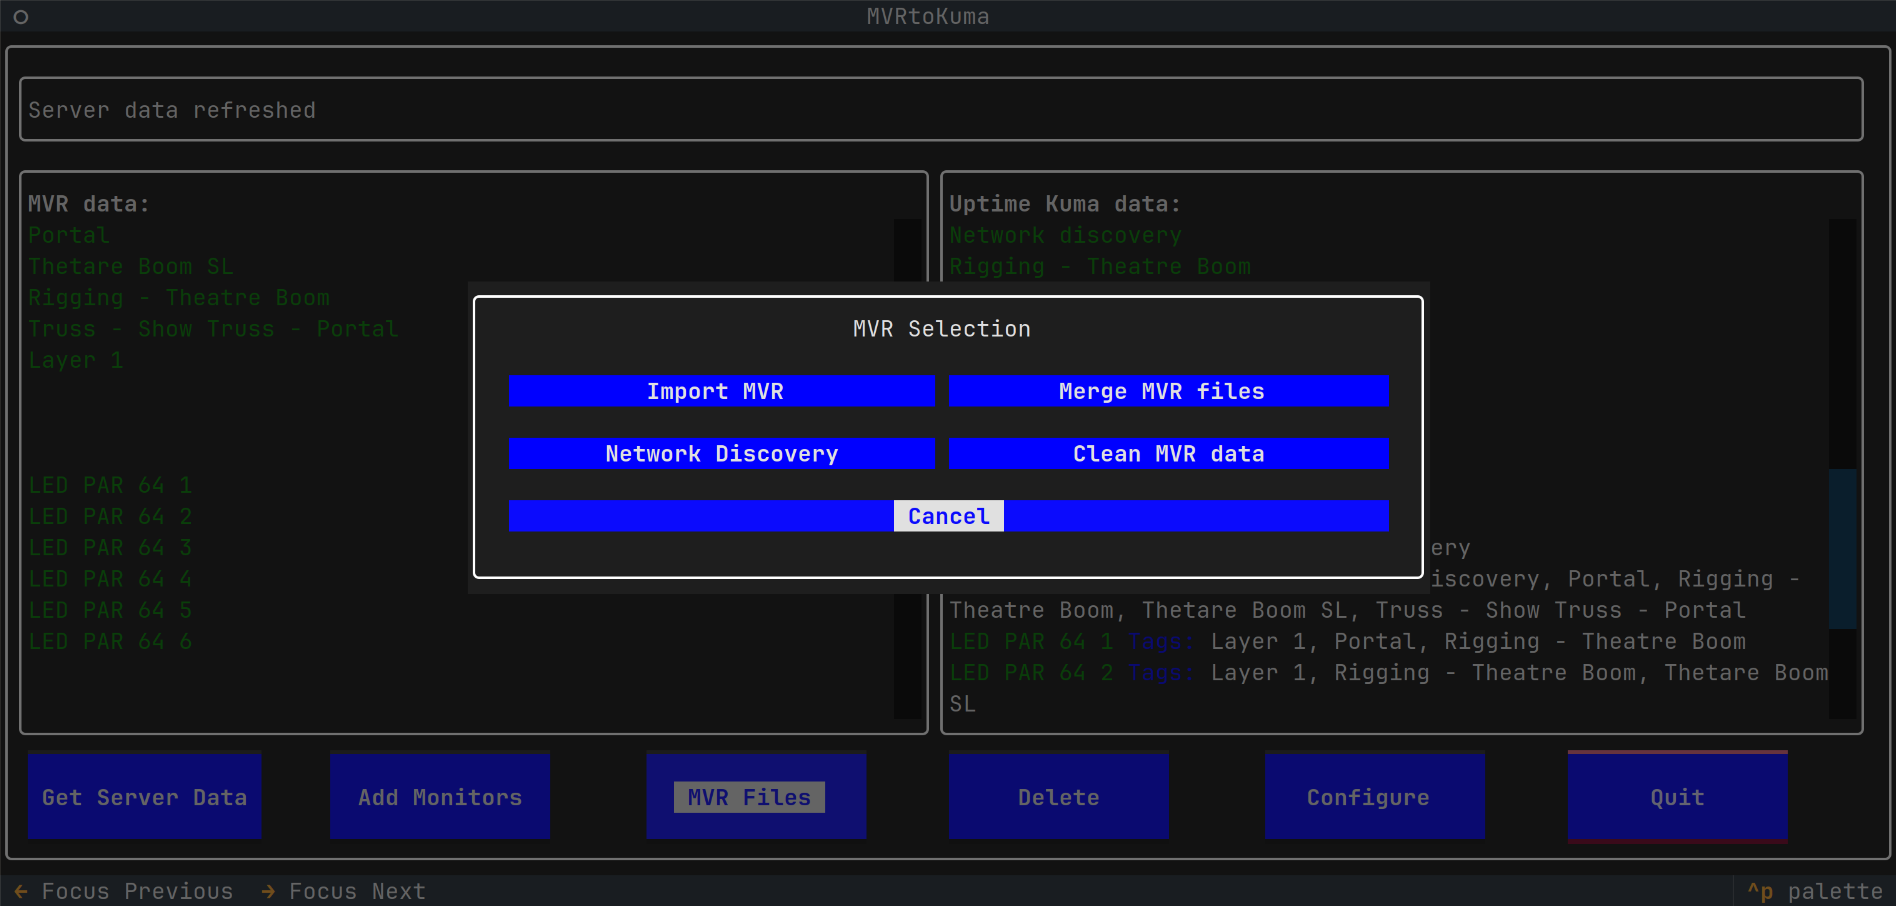
MVR Files - Import MVRto import an MVR file with fixtures. Make sure the MVR contains data with IPv4 addresses.- An MVR file with IPv4 addresses can be created via the
MVR Files - Network Discoveryif your fixtures are on the network and if they respond to ArtNet discovery via ArtPoll.
- An MVR file with IPv4 addresses can be created via the
- Use
Add Monitorsto create monitors in Uptime Kuma
-
- Set IP address, username and password for access to Uptime Kuma server
- Choose to (not) display IDs of objects in MVR/Uptime Kuma
- Choose a larger or single line buttons in the MVRtoKuma interface
-
-
- Loads fixtures from MVR file
- Reads IPv4 addresses of these fixtures
- Reads layer, class and position names
-
- Takes fixtures and IPv4 data from one MVR file
- Adds the IPv4 data into matching fixtures in another MVR file
- Fixture matching is based either on fixtures UUIDs or on DMX Universe and Addresses
-
- Create a list of devices found on the local network. MVR file with these devices is created
- Import the discovered devices directly, or from the created file
-
- Cleans the MVR imported data in the currently running program
-
-
- Creates monitors in Uptime Kuma
- Allows to select which MVR features will be used for tags:
- Layers
- Classes
- Positions
-
- Allows to delete in the Uptime Kuma:
- All monitors
- All tags
- Monitors matching those from imported MVR
- Tags matching those from imported MVR
- Allows to delete in the Uptime Kuma:

Install uv on your system. uv will manage python and dependencies
installation and will also run the application.
Clone the repository or download it and uzip.
Inside the downloaded/unzipped repository, run:
uv run run.pyWith a small amount of effort, it is possible to run MVRtoKuma on Android:
- Install Termux
- Install uv, python, wget:
pkg install uv python3 wget- Download and unzip MVRtoKuma:
wget https://github.com/vanous/MVRtoKuma/archive/refs/heads/master.zip
unzip master.zip
cd MVRtoKuma-master/- You will need to edit the pyproject.toml and change python to 3.11, then you can run it:
uv run run.py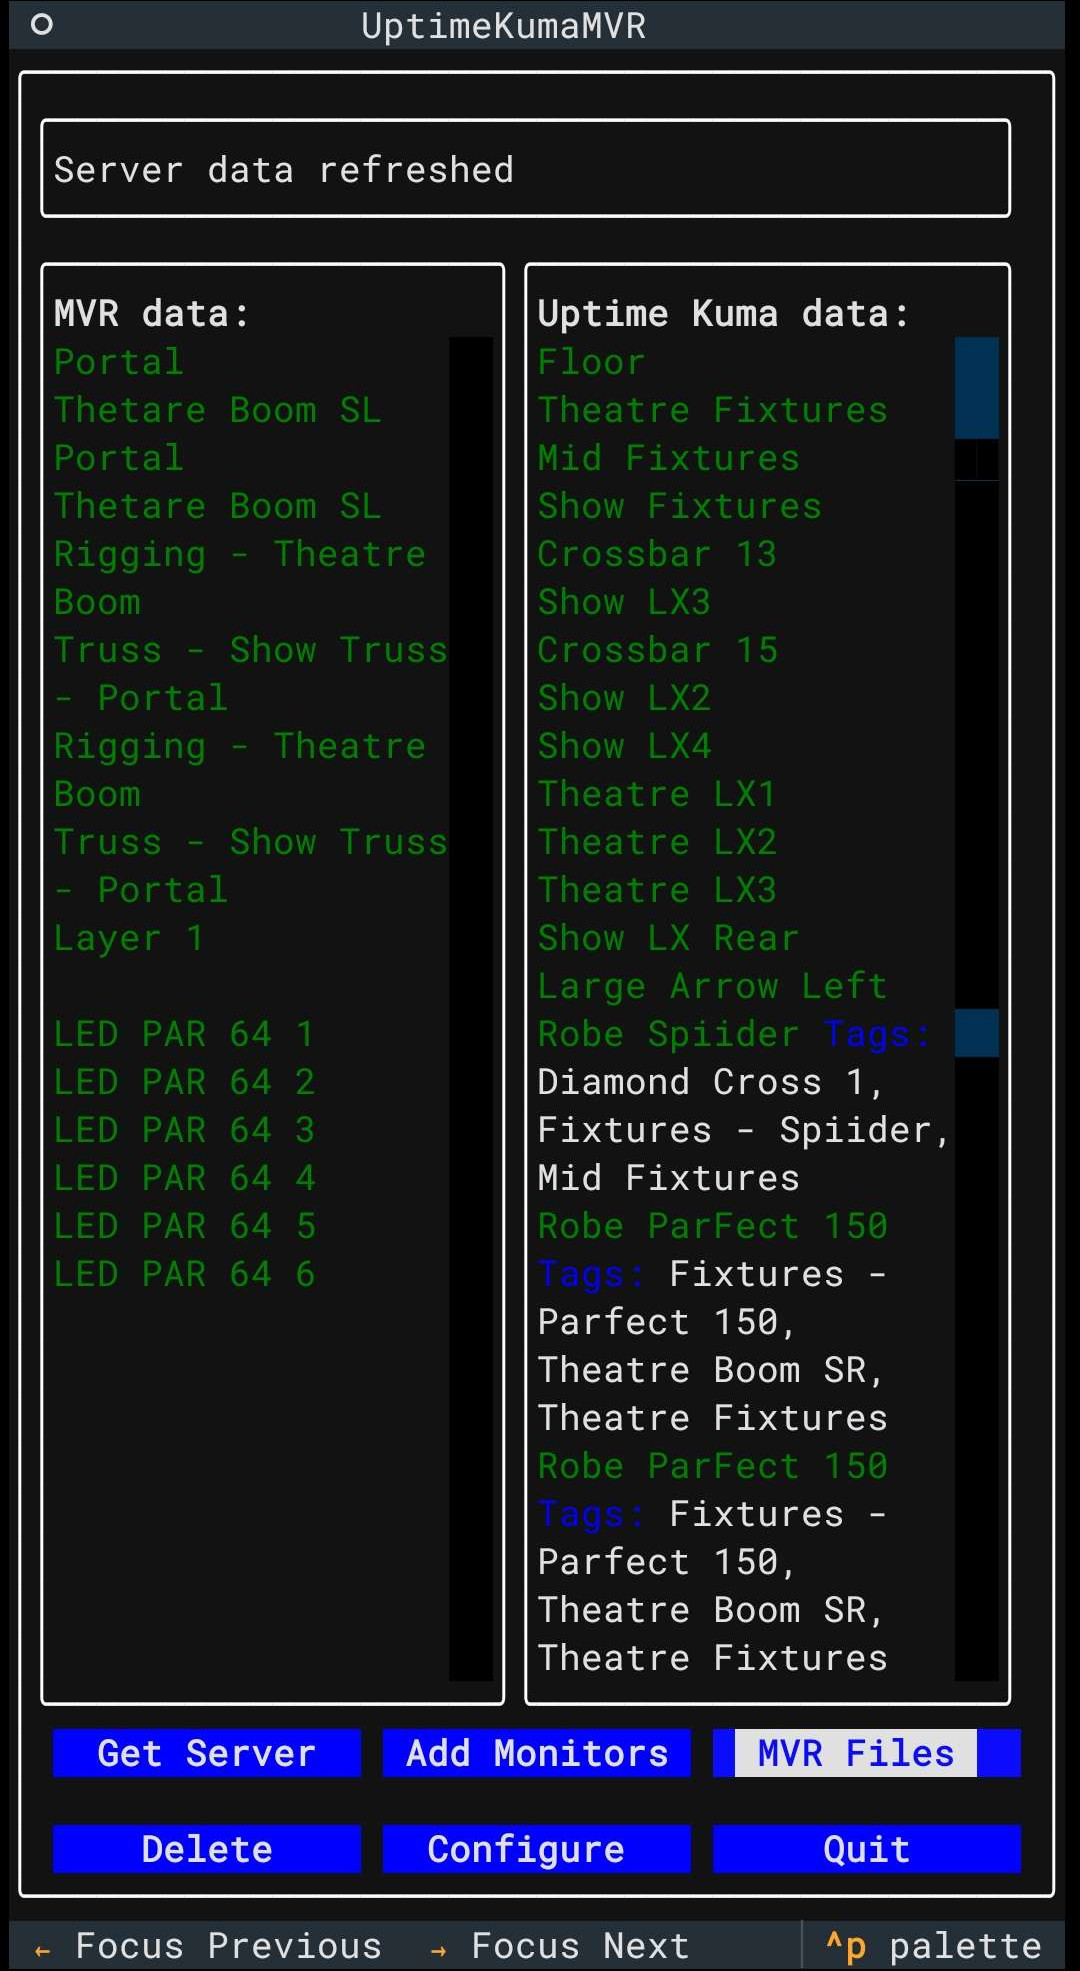
uv run textual console
uv run textual run --dev run.py
- Issues are handled via https://github.com/git-bug/git-bug
- For pushing/pulling of bugs, either ssh based cloning must be used, or these aliases can be used:
[alias]
	bugs = bug bug
	bug-users = bug user user
	open-bug = bug bug new
	push-bugs = "! fn(){ remote=origin; echo \"fetching bugs from '$remote' remote...\" >&2; git push  \"$remote\" --prune refs/bugs/* refs/identities/*; }; fn"
	pull-bugs = "! fn(){ remote=origin; echo \"fetching bugs from '$remote' remote...\" >&2; git fetch \"$remote\" \"refs/bugs/*:refs/bugs/*\" \"refs/identities/*:refs/identities/*\" && { [ ! -d .git/git-bug/cache/ ] || rm -r .git/git-bug/cache/; }; }; fn"
- I have no idea yet how to enable collaborators to pull/push bugs, probably by adding write access to the repo...?
- Try to use this and report any issues :)
- Maybe a branch with bugs via PR?
- GitHub independent
- Local TUI and WEBUI
- No notification about new issues/comments
Initial pyinstaller setup
uv run pyinstaller packaging.spec
/usr/bin/podman run \
 --replace \
 --restart=always \
 --detach \
 --publish 3001:3001/tcp \
 --volume /full path to the directory/data:/app/data:Z \
 --name uptime-kuma \
docker.io/louislam/uptime-kuma:1@software{pymvr2025,
title = {pyMVR: Python Library for My Virtual Rig},
author = {{OpenStage}},
year = {2025},
version = {1.0.4},
url = {https://github.com/open-stage/python-mvr}
}