Resamplers and Wavtools
In UTAU, resampler is the core engine that does the major works of synthesis: changing the pitch and duration of the audio sample, and applying flags to the audio. Audio rendered with different resamplers has different sound quality. Different resamplers also provide different set of flags. OpenUtau ships with a resampler, worldline. There are also many third-party resamplers.
Wavtool is the program that concatenates the audio slices from resampler into the final audio. OpenUtau ships with two wavtools, simple and convergence. There are also many third-party wavtools.
After you install resampler, please switch to "CLASSIC" renderer to use the resampler you installed.
Resampler must be an executable (.exe). Resamplers can be placed in subfolders inside the Resamplers folder.
- In the OpenUtau folder, locate the resampler folder named
Resamplers. - Open the resampler folder and place the resampler in the folder.
In OpenUtau version 0.1.119 or higher, resamplers can be installed by dragging and dropping the .exe file onto the main OpenUtau window and selecting "Install as resampler".

As of writing this, OpenUtau v0.1.565.0 has released with a new feature that allows you to directly run the Wine path without creating wrappers for each individual resampler.
Before we begin installing resamplers, let’s prepare the environment.
Section 1, “Installing Homebrew.”
To install Homebrew you will need to head over to the Homebrew website.
From here, you will want to copy the installation command, and open Terminal. If you are not familiar with Terminal, it is in your Applications > Utilities > Terminal.
-
In the Terminal control panel, you will want to paste the installation command into the console. It will begin running the installation.
-
The installation will pause and ask for your computer’s passkey. Input the passkey and the installation will continue.
-
If you are on Intel, after it installs the, “X code command line tools,” it may run into a fatal error when updating the Homebrew install.
-
Do not worry, head over to,
System Preferences > Security and Privacy, and scroll down until you see,“allow install–sh.”Select OK to continue.Now it will run the rest of the install and you have successfully Homebrewed your Mac.
Section 2, “Installing Wine.”
In order to install Wine, head to the WineHQ website.
https://github.com/Gcenx/macOS_Wine_builds/releases
-
Download Wine Staging from the Github releases page.
-
Drag the Wine Staging .zip to your desktop and extract.
-
After extracting the zip, run the Wine Staging application.
-
The Wine installer will run into an error since it is an external application downloaded from the internet. Head to
System Preferences > Security and Privacy,and allow Wine access to run. After this, Wine will be installed to your computer.
After performing these two steps, we will then prepare the environment for the resamplers. Inside of Terminal we will want to begin a new session and run the installation for Wine Crossover.
If brew command is not found, please refer to this stackoverflow thread.
    brew tap gcenx/wine
    brew install –cask –no-quarantine wine-crossover
After running these two commands your environment is set!
Section 3, “Finding your Wine path.”
Before we install anything, we must find our Wine path. The install location of your Wine will differ between Intel and Silicon. To find your Wine path, open Terminal and run …
which wine
For Intel users, your wine path will either contain 32 or 64.
/usr/local/bin/wine32on64
For Silicon users, your Wine path will be inside homebrew.
/opt/homebrew/bin/wine
Section 4, “Installing Resamplers.“
To install resamplers, you can head into to the Tested Resamplers and Directories section of this page.
After installing the resampler of your choice, there are two ways to install. You can drag and drop the .exe into the UI, or, you can head over to tools. From there, you can Install Wavtool/Resampler (.exe)…
To set the Wine path, do, Command + Shift + G, and paste in your Wine path by right-clicking the text field.
Return to OpenUTAU, and select, “CLASSIC,” in the resampler field. To the right there will be a cog icon. From here, you will be able to select your downloaded resamplers and wavtools.
Macres provides a native Linux version. Put it into the resamplers folder of OpenUtau.
To use Windows resamplers into Linux, follow this method:
- Install Wine
- Put any Windows resampler to
Resamplersfolder (should be on~/.local/share/OpenUtau/Resamplers). You can also install it by usingTools > Install Wavtool/Resampler (.exe)in OpenUtau. ChooseInstall as resampler. - In OpenUtau, enable wine compatibility by setting wine path in
Tools > Preferences > Advanced > Wine Path.... ClickingDetectshould automatically pick wine from your$PATH, otherwise clickSelectto pick it yourself. - You can now use Windows resamplers in OpenUtau.
This is a list of all UTAU resamplers tested with OpenUtau.
| Resampler | Author | Resample Manifest | Additional Notes |
|---|---|---|---|
| worldline | StAkira | Built into OpenUtau. Works on all platforms. | |
| bkh01.exe | Zteer | ||
| doppeltler32.exe | Ameya | doppeltler32.yaml | |
| doppeltler64.exe | Ameya | doppeltler64.yaml | |
| EFB-GT.exe | Custom.Maid | ||
| EFB-PB.exe | Custom.maid | ||
| f2resamp32.exe | Ameya | f2resamp32.yaml | |
| f2resamp64.exe | Ameya | f2resamp64.yaml | |
| fresamp11.exe | Ameya | ||
| fresamp12.exe | Ameya | ||
| fresamp14.exe | Ameya | ||
| fresamp14omp.exe | Ameya | Ported to OpenMP with faster rendering speed than fresamp14.exe. | |
| lessampler.exe | YuzukiTsuru | See additonal notes. | |
| macres.exe | titinko | ||
| model4.exe | Ameya | ||
| moresampler.exe | Kanru Hua | moresampler.yaml | See adjustments for compatibility. |
| phavoco.exe | Ameya | ||
| phaavoco.exe | Ameya | ||
| resampler.exe | Ameya | UTAU built-in resampler. | |
| SpaceWorld_win64.exe | LovelyA72 | See adjustments for compatibility. | |
| StrayCatRunner.exe | Astel123457 | StrayCatRunner.yaml | |
| straycat-rs.exe | UtaUtaUtau | straycat-rs.yaml | |
| StrayCat.py | UtaUtaUtau | StrayCat.yaml | Deprecated in place of straycat-rs (above) |
| TIPS.exe | ScientistB | ||
| tn_fnds.exe | Zteer | tn_fnds.yaml | |
| UDB | YuzukiTsuru | UDB means UTAU Debug Engine. | |
| vs4u.exe | AckieSound | ||
| w4u.exe | Zany | w4u.yaml | |
| WARP.exe | Custom.Maid | ||
| wn4u.exe | Zany | See adjustments for compatibility. | |
| young3.exe | Zany |
-
moresampler.exe
- Add
moresampler.exeand the defaultmoreconfig.txtto theResamplersfolder. - Add
moresampler.exetoWavtoolsfolder withoutmoreconfig.txt. - Moresampler should now function as either resampler only, or as both wavtool and resampler.
- If you're using simple/convergence wavtool and encounter slow rendering times on macOS (possibly other OS too), modify
moreconfig.txtand switchmultithread-synthesistooff.
- Add
-
SpaceWorld_win64.exe and wn4u.exe
- May experience issues if the voicebank is missing any frq files. SpaceWorld version 1.0.1 will not crash in the event of a missing frq file.
-
lessampler
- In development, lack of flag support
- Oversized Audio Model Attention
| Resampler | Author | Resample Manifest | Additional Notes |
|---|---|---|---|
| worldline | StAkira | Built into OpenUtau. Works on all platforms. | |
| macres | titinko | macres.yaml |
| Resampler | Author | Resample Manifest | Additional Notes |
|---|---|---|---|
| worldline | StAkira | Built into OpenUtau. Works on all platforms. | |
| macres | titinko | macres.yaml |
A Resampler Manifest is a YAML file that manages expressions supported or unsupported by each resampler.
The Resampler Manifest primarily serves two purposes:
- Enables batch addition of supported flags to a project using the
Add all expressions suggested by renderersbutton in theExpressionseditor.
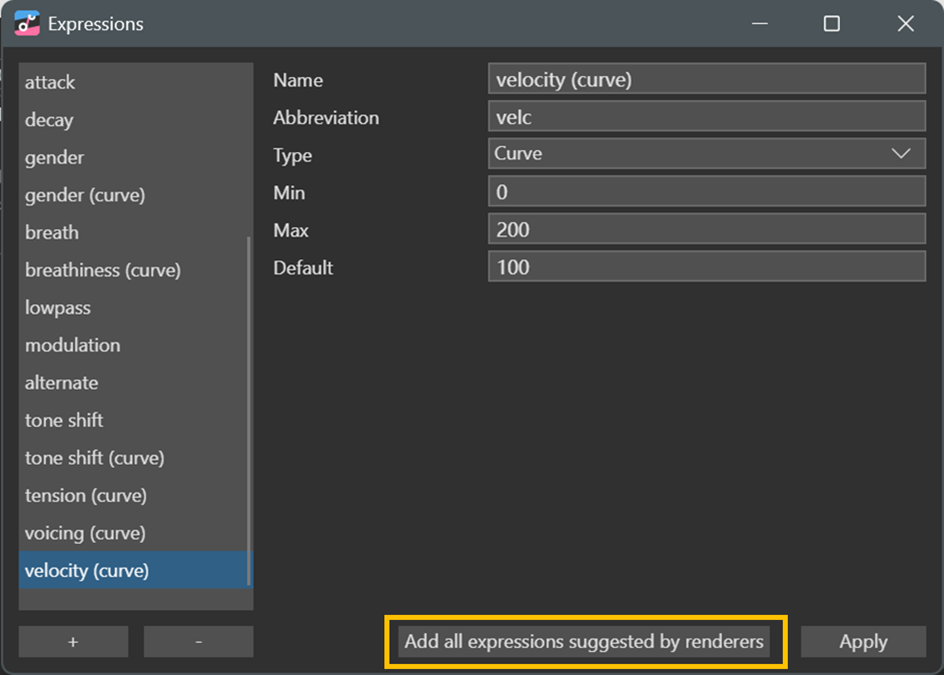
- Disable expressions not listed in this file to account for cases where each resampler has flags with different default values, maximum/minimum values, or effects.
Resampler manifests should have the same name as the resampler executable, stored in the same folder. The manifest must have a .yaml file extension. For example, the resampler manifest for moresampler.exe should be moresampler.yaml located in the same folder with moresampler.exe.
Below is a full example of a resampler manifest for Moresampler. To create a resampler manifest with OpenUtau, add the resampler's expressions to any .ustx project file. Open the project file in a text editor and copy the expressions: section into a blank manifest file.
expressions:
  gen:
    name: Gender Factor
    abbr: gen
    type: Numerical
    min: -100
    max: 100
    default_value: 0
    is_flag: true
    flag: g
  mbre:
    name: Breathiness (Moresampler)
    abbr: mbre
    type: Numerical
    min: -100
    max: 100
    default_value: 0
    is_flag: true
    flag: Mb
  tens:
    name: Tension
    abbr: tens
    type: Numerical
    min: -100
    max: 100
    default_value: 0
    is_flag: true
    flag: Mt
  pit:
    name: Pitch deviation (flag)
    abbr: pit
    type: Numerical
    min: -1200
    max: 1200
    default_value: 0
    is_flag: true
    flag: t
  pkcp:
    name: Peak Compressor
    abbr: pkcp
    type: Numerical
    min: 0
    max: 100
    default_value: 86
    is_flag: true
    flag: P
  amp:
    name: Amplitude Modulation
    abbr: amp
    type: Numerical
    min: -100
    max: 100
    default_value: 0
    is_flag: true
    flag: A
  cons:
    name: Unvoiced Consonant Gain
    abbr: cons
    type: Numerical
    min: -20
    max: 100
    default_value: 0
    is_flag: true
    flag: b
  fstr:
    name: Force Stretch
    abbr: fstr
    type: Options
    min: 0
    max: 1
    default_value: 0
    is_flag: true
    options:
    - ''
    - e
    - Me
  opn:
    name: Openness
    abbr: opn
    type: Numerical
    min: -100
    max: 100
    default_value: 0
    is_flag: true
    flag: Mo
  res:
    name: Resonance
    abbr: res
    type: Numerical
    min: -100
    max: 100
    default_value: 0
    is_flag: true
    flag: Mr
  dry:
    name: Dryness
    abbr: dry
    type: Numerical
    min: -100
    max: 100
    default_value: 0
    is_flag: true
    flag: Md
  cors:
    name: Coarseness
    abbr: cors
    type: Numerical
    min: 0
    max: 100
    default_value: 0
    is_flag: true
    flag: MC
  grwl:
    name: Growl
    abbr: grwl
    type: Numerical
    min: 0
    max: 100
    default_value: 0
    is_flag: true
    flag: MG
  dist:
    name: Distortion
    abbr: dist
    type: Numerical
    min: 0
    max: 100
    default_value: 0
    is_flag: true
    flag: MD
  stbl:
    name: Stabilization
    abbr: stbl
    type: Numerical
    min: 0
    max: 10
    default_value: 0
    is_flag: true
    flag: Ms
  mint:
    name: Model Interpolation
    abbr: mint
    type: Numerical
    min: 0
    max: 100
    default_value: 100
    is_flag: true
    flag: Mm
To disable flags not listed, add a line expression_filter: true at the beginning or end of the file.
- On your unzipped OpenUtau folder, locate the wavtool folder named
Wavtools. - Open the wavtool folder and place the downloaded wavtool on the folder.
In OpenUtau version 0.1.119 or higher, wavtools can be installed by dragging and dropping the .exe file onto the main OpenUtau window and selecting "Install as wavtool".
In OpenUtau 0.1.560 or higher, external Windows wavtools are now supported on macOS and Linux.
- Install Wine (follow the previous guide under macOS/Linux resamplers)
- In OpenUtau, enable wine compatibility by setting wine path in
Tools > Preferences > Advanced > Wine Path.... ClickingDetectshould automatically pick wine from your$PATH, otherwise clickSelectto pick it yourself. (skip if you already did this) - Install Windows wavtools (e.g.
wavtool.exe) by usingTools > Install Wavtool/Resampler (.exe). You can drag and drop the .exe into OpenUtau window on macOS. ChooseInstall as wavtool. - You can now use Windows wavtools in OpenUtau
Do note that only Windows wavtools are supported, no support for external native wavtools at the moment.
Below is a list of all UTAU wavtools tested with OpenUtau.
| Wavtool | Author | Additonal Notes |
|---|---|---|
| simple | StAkira | Built into OpenUtau. Works on all platforms. |
| convergence | StAkira | Also built into OpenUtau. Uses phase compensation. |
| moresampler.exe | Kanru Hua | See adjustments for compatibility. |
| wavtool64 | Ameya | |
| wavtool4vcv | nmasao |